Crafting Perfect Layers: Pro Tips for Your No-Bake Chocolate Lasagna
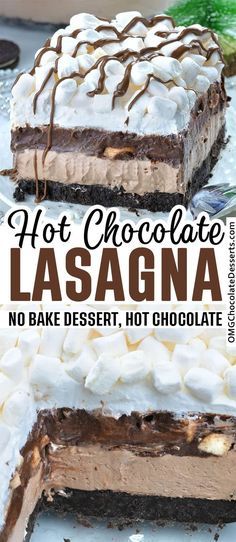
The mere mention of chocolate lasagna conjures images of pure, unadulterated decadence. This no-bake marvel has stolen hearts at countless family gatherings and potlucks, captivating guests with its impressive layered appearance and irresistible blend of textures and flavors. Imagine a crunchy Oreo crust, a velvety cheesecake layer, a rich chocolate-vanilla pudding, all crowned with a fluffy whipped topping and a generous sprinkle of crushed cookies and chocolate sauce. It’s a symphony for the senses, yet astonishingly simple to assemble. If you've been dreaming of creating this show-stopping dessert, you're in the right place. We’re diving deep into the art of the perfect no-bake chocolate lasagna, arming you with pro tips to ensure every slice is a masterpiece. The beauty of this dessert lies not just in its taste, but in its accessibility. No need for an oven, no complicated techniques – just a few quality ingredients and a little patience between layers. This makes it an ideal choice for busy weeknights, summer entertaining when you want to avoid heating up your kitchen, or a delightful treat for beginner bakers looking to impress. For more ideas on how to create an effortless yet elegant dessert, be sure to check out No-Bake Oreo Chocolate Lasagna: Effortless Decadence for Any Occasion.The Magic Behind the Layers: Why Your Ingredients Matter
Creating a truly exceptional chocolate lasagna starts with understanding the role of each ingredient. Quality and type truly make a difference in achieving that perfect texture and taste.- The Oreo Crust: Foundation of Flavor
Your journey begins with the classic Oreo cookie. Opt for regular Oreos, not the double-stuffed variety. The reason? Regular Oreos offer the perfect ratio of cookie to cream, ensuring a sturdy crust that binds beautifully with melted butter. Double-stuffed versions tend to be too creamy, potentially leading to a greasier or less cohesive crust. The butter, whether dairy butter or margarine, acts as the crucial binder, transforming the crushed cookies into a solid, delectable base.
- The Cheesecake Layer: Creamy, Tangy Bliss
This is where the magic of "cheesecake" truly shines. The star here is full-fat cream cheese. Do not be tempted by Neufchâtel or low-fat varieties, as they lack the richness and stability needed to create that lusciously creamy, firm texture. Combined with fine powdered sugar (confectioners' sugar), which dissolves seamlessly for a silky-smooth finish, and a touch of vanilla extract for warmth, this layer becomes an irresistible counterpoint to the chocolate. A portion of Cool Whip is folded in to lighten the texture, making it airy and delightful.
- The Pudding Layer: Double the Delight
The secret to the pudding layer's amazing depth of flavor often lies in combining both chocolate and vanilla instant pudding mixes. This creates a nuanced, balanced taste that's more complex than a single flavor alone. Crucially, use cold milk – the colder, the better. Cold milk helps the pudding set quickly and properly, preventing a runny, unappealing layer. Any type of milk works, but the temperature is non-negotiable.
- The Whipped Topping & Garnish: The Grand Finale
A generous layer of Cool Whip provides a light, fluffy cap to your dessert, offering a beautiful visual contrast and a refreshing finish. The reserved crushed Oreos from your crust and a decadent drizzle of chocolate sauce elevate the presentation and add an extra burst of flavor and texture. This final touch is what truly ties the entire chocolate lasagna together.
Mastering the Method: A Step-by-Step Guide to Perfection
While the recipe for no-bake chocolate lasagna is straightforward, perfecting each layer ensures a professional-looking and tasting dessert.- The Crust Layer: Build a Strong Foundation
Begin by finely crushing your Oreos. A food processor is your best friend here, creating uniform crumbs in seconds. If you don't have one, a sturdy freezer bag and a rolling pin work just as well – just ensure the crumbs are fine, without large chunks. Reserve about half a cup for your topping later. Combine the remaining crumbs with melted butter until thoroughly coated. Press this mixture firmly into a 9"x13" baking dish. The key here is firm packing; this prevents a crumbly crust. Chill for at least 20 minutes to set.
- The Cheesecake Layer: Smooth and Spready
In a large bowl, combine softened cream cheese, powdered sugar, and vanilla extract. Beat with an electric hand mixer until exceptionally smooth and creamy, scraping down the sides as needed. Then, gently fold in 8 ounces of Cool Whip until just combined. Evenly spread this luscious mixture over your chilled Oreo crust. For easier spreading, place small dollops of the mixture across the crust before gently smoothing it out with an offset spatula. Chill for another 20 minutes.
- The Pudding Layer: Thick and Dreamy
In a separate large bowl, whisk together the cold milk, chocolate pudding mix, and vanilla pudding mix. Start on a slow setting with your electric mixer to incorporate the powders, then increase to medium until the mixture thickens beautifully – usually about 2 minutes. Avoid overmixing, as this can sometimes cause instant pudding to thin out. Carefully spread this thickened pudding over the cheesecake layer. Chill for at least 20 minutes, or until the pudding is completely set.
- The Top Layer: The Crowning Glory
Finally, spread the remaining whipped topping evenly over the set pudding layer. Sprinkle with your reserved crushed Oreos and artfully drizzle with chocolate sauce. For that ultimate "wow factor," consider adding a few chocolate shavings or fresh berries. The crucial final step: return the entire chocolate lasagna to the refrigerator for a minimum of one hour, or preferably longer, to allow all the layers to firm up and meld together beautifully. This extended chilling time is vital for clean slices.
Pro Tips & Tricks for a Flawless Chocolate Lasagna
Making this dessert is simple, but a few expert tips can elevate your creation from good to absolutely unforgettable.- The Chill Factor is King: This is arguably the most important tip. Do not skip or shorten the chilling time for each layer. Twenty to twenty-five minutes per layer allows it to firm up sufficiently, preventing layers from bleeding into each other and ensuring those distinct, beautiful strata. The final chill is essential for structural integrity, making it easy to slice and serve.
- Crushing Perfection: Whether you use a food processor or a rolling pin, aim for uniform, fine crumbs for your Oreo crust. Large chunks can make the crust uneven and prone to crumbling when cut. If using a rolling pin, place Oreos in a sturdy zip-top bag and roll firmly until consistently crushed.
- Spreading with Ease: When applying the cream cheese and pudding layers, avoid dumping a large amount in the center and trying to spread it out. Instead, place small dollops evenly across the previous layer. Then, gently and slowly spread from the center outwards using an offset spatula or the back of a spoon. This technique minimizes disturbance to the layer underneath, helping maintain those clean lines.
- Preventing a Watery Pudding: Always use *ice-cold milk* for your pudding layer. If your milk isn't cold enough, the pudding may not set properly, resulting in a runny layer. If you find your pudding isn't thickening, try placing it in the fridge for 5-10 minutes to help it along before spreading.
- For Clean Slices: Before slicing, dip your knife in hot water and wipe it clean between each cut. This creates warm, clean edges that glide through the layers without dragging, leaving you with picture-perfect servings.
- Flavor Boosters: A touch of instant espresso powder can deepen the chocolate flavor in your pudding layer without adding a coffee taste. A pinch of sea salt in the crust can also enhance the overall flavor profile by balancing the sweetness.
Serving, Storing, and Customizing Your Decadent Dessert
Once your chocolate lasagna has fully chilled, it's ready to be the star of the show. Serve it chilled, allowing its distinct layers and textures to shine. This dessert is fantastic for almost any occasion, from casual family dinners to more formal celebrations. It's truly an irresistible treat that comes together quickly, earning its place as a quick and easy family dessert. For more insights into why this dessert is a family favorite, take a look at The Irresistible No-Bake Chocolate Lasagna: Quick & Easy Family Dessert. To store leftovers (if there are any!), cover the dish tightly with plastic wrap or aluminum foil and keep it refrigerated. It will stay fresh and delicious for 3-5 days. While it can be frozen for longer storage (up to a month), the texture of the whipped topping may change slightly upon thawing. Don't be afraid to get creative and customize your chocolate lasagna to suit your taste or the occasion!- Crust Variations: Instead of Oreos, try a graham cracker crust, Nilla wafers, or even shortbread cookies.
- Pudding Power-Ups: Experiment with different pudding flavors! All chocolate, white chocolate, butterscotch, or even banana pudding can create exciting new taste profiles.
- Topping Extravaganza: Beyond crushed Oreos and chocolate sauce, consider fresh berries (raspberries, strawberries), mini chocolate chips, toasted coconut flakes, chopped nuts, caramel sauce, or even a sprinkle of festive sprinkles for holidays.
- Seasonal Swings: Add a layer of peppermint extract to the pudding for a holiday twist, or pumpkin spice for a fall-themed treat.
The no-bake chocolate lasagna is more than just a dessert; it's a testament to how simple ingredients, thoughtfully layered, can create something truly extraordinary. By following these pro tips, paying attention to the details of each layer, and embracing the crucial chilling times, you'll be well on your way to crafting a dessert that not only looks spectacular but tastes divinely delicious. So go ahead, gather your ingredients, and prepare to delight friends and family with your masterful creation!
